![]()

ボーナスチュートリアル:最新の畳み込みネットワークを用いた顔認識
第2週目、第3日目:最新の畳み込みネットワーク
Neuromatch Academyによる
コンテンツ作成者: Laura Pede, Richard Vogg, Marissa Weis, Timo Lüddecke, Alexander Ecker
コンテンツレビュアー: Arush Tagade, Polina Turishcheva, Yu-Fang Yang, Bettina Hein, Melvin Selim Atay, Kelson Shilling-Scrivo
コンテンツ編集者: Roberto Guidotti, Spiros Chavlis
制作編集者: Anoop Kulkarni, Roberto Guidotti, Cary Murray, Gagana B, Spiros Chavlis
このノートブックはBen Heilによる初期バージョンを基にしています
チュートリアルの目的
このチュートリアルで学ぶこと:
- 最新のCNNを用いた顔認識の応用例。
- 顔認識における倫理的側面。
# @title Tutorial slides
from IPython.display import IFrame
link_id = "4r2dp"
print(f"If you want to download the slides: https://osf.io/download/{link_id}/")
IFrame(src=f"https://mfr.ca-1.osf.io/render?url=https://osf.io/{link_id}/?direct%26mode=render%26action=download%26mode=render", width=854, height=480)このチュートリアルの動画用スライドです。スライドをローカルにダウンロードしたい場合は、こちらをクリックしてください。
セットアップ
# @title Install dependencies
# @markdown Install `facenet` - A model used to do facial recognition.
# @markdown This is an old package and requires we downgrade many others.
# @markdown You may be asked to restart your session the first time you run this.
# @title Install and import feedback gadget
from vibecheck import DatatopsContentReviewContainer
def content_review(notebook_section: str):
return DatatopsContentReviewContainer(
"", # No text prompt
notebook_section,
{
"url": "https://pmyvdlilci.execute-api.us-east-1.amazonaws.com/klab",
"name": "neuromatch_dl",
"user_key": "f379rz8y",
},
).render()
feedback_prefix = "W2D3_T2_Bonus"# Imports
import glob
import torch
import numpy as np
import sklearn.decomposition
import matplotlib.pyplot as plt
from PIL import Image
from torchvision import transforms
from torchvision.utils import make_grid
from torchvision.datasets import ImageFolder
from facenet_pytorch import MTCNN, InceptionResnetV1# @title Set random seed
# @markdown Executing `set_seed(seed=seed)` you are setting the seed
# For DL its critical to set the random seed so that students can have a
# baseline to compare their results to expected results.
# Read more here: https://pytorch.org/docs/stable/notes/randomness.html
# Call `set_seed` function in the exercises to ensure reproducibility.
import random
import torch
def set_seed(seed=None, seed_torch=True):
"""
Function that controls randomness. NumPy and random modules must be imported.
Args:
seed : Integer
A non-negative integer that defines the random state. Default is `None`.
seed_torch : Boolean
If `True` sets the random seed for pytorch tensors, so pytorch module
must be imported. Default is `True`.
Returns:
Nothing.
"""
if seed is None:
seed = np.random.choice(2 ** 32)
random.seed(seed)
np.random.seed(seed)
if seed_torch:
torch.manual_seed(seed)
torch.cuda.manual_seed_all(seed)
torch.cuda.manual_seed(seed)
torch.backends.cudnn.benchmark = False
torch.backends.cudnn.deterministic = True
print(f'Random seed {seed} has been set.')
# In case that `DataLoader` is used
def seed_worker(worker_id):
"""
DataLoader will reseed workers following randomness in
multi-process data loading algorithm.
Args:
worker_id: integer
ID of subprocess to seed. 0 means that
the data will be loaded in the main process
Refer: https://pytorch.org/docs/stable/data.html#data-loading-randomness for more details
Returns:
Nothing
"""
worker_seed = torch.initial_seed() % 2**32
np.random.seed(worker_seed)
random.seed(worker_seed)# @title Set device (GPU or CPU). Execute `set_device()`
# especially if torch modules used.
# Inform the user if the notebook uses GPU or CPU.
def set_device():
"""
Set the device. CUDA if available, CPU otherwise
Args:
None
Returns:
Nothing
"""
device = "cuda" if torch.cuda.is_available() else "cpu"
if device != "cuda":
print("WARNING: For this notebook to perform best, "
"if possible, in the menu under `Runtime` -> "
"`Change runtime type.` select `GPU` ")
else:
print("GPU is enabled in this notebook.")
return deviceSEED = 2021
set_seed(seed=SEED)
DEVICE = set_device()セクション1:顔認識
所要時間の目安:約12分
セクション1.1:データのダウンロードと準備
# @title Download Faces Data
import requests, zipfile, io, os

# Original link: https://github.com/ben-heil/cis_522_data.git
url = 'https://osf.io/2kyfb/download'

fname = 'faces'

if not os.path.exists(fname+'zip'):
  print("Data is being downloaded...")
  r = requests.get(url, stream=True)
  z = zipfile.ZipFile(io.BytesIO(r.content))
  z.extractall()
  print("The download has been completed.")
else:
  print("Data has already been downloaded.")
# @title Video 1: Face Recognition using CNNs
from ipywidgets import widgets
from IPython.display import YouTubeVideo
from IPython.display import IFrame
from IPython.display import display
class PlayVideo(IFrame):
def __init__(self, id, source, page=1, width=400, height=300, **kwargs):
self.id = id
if source == 'Bilibili':
src = f'https://player.bilibili.com/player.html?bvid={id}&page={page}'
elif source == 'Osf':
src = f'https://mfr.ca-1.osf.io/render?url=https://osf.io/download/{id}/?direct%26mode=render'
super(PlayVideo, self).__init__(src, width, height, **kwargs)
def display_videos(video_ids, W=400, H=300, fs=1):
tab_contents = []
for i, video_id in enumerate(video_ids):
out = widgets.Output()
with out:
if video_ids[i][0] == 'Youtube':
video = YouTubeVideo(id=video_ids[i][1], width=W,
height=H, fs=fs, rel=0)
print(f'Video available at https://youtube.com/watch?v={video.id}')
else:
video = PlayVideo(id=video_ids[i][1], source=video_ids[i][0], width=W,
height=H, fs=fs, autoplay=False)
if video_ids[i][0] == 'Bilibili':
print(f'Video available at https://www.bilibili.com/video/{video.id}')
elif video_ids[i][0] == 'Osf':
print(f'Video available at https://osf.io/{video.id}')
display(video)
tab_contents.append(out)
return tab_contents
video_ids = [('Youtube', 'jJqEv8hpRa4'), ('Bilibili', 'BV17B4y1K7WV')]
tab_contents = display_videos(video_ids, W=854, H=480)
tabs = widgets.Tab()
tabs.children = tab_contents
for i in range(len(tab_contents)):
tabs.set_title(i, video_ids[i][0])
display(tabs)# @title Submit your feedback
content_review(f"{feedback_prefix}_Face_Recognition_using_CNNs_Video")大規模なCNNの応用例の一つに顔認識があります。顔認識の問題設定は、これまで見てきた画像分類とは少し異なります。顔認識では、モデルが学習できる個人の数を固定したくありません。もし固定してしまうと、新しい人物を学習するためには出力層の構造を変更し、新たに再学習する必要が出てきます。
代わりに、同一人物の画像は埋め込み空間上で近く、異なる人物の画像は遠くなるような**埋め込み(embedding)**を学習するモデルを訓練します。モデルが訓練されると、入力画像から対応する埋め込みベクトルを出力します。
これを実現するために、顔認識では通常、同一人物の2枚の画像(「アンカー」と「ポジティブ」画像)と異なる人物の1枚の画像(「ネガティブ」画像)を比較するトリプレットロスを用います。この損失関数は、アンカーとネガティブの距離が、アンカーとポジティブの距離にマージンを加えたものより大きくなることを要求します。
セクション1.2:データの表示と変換
よく訓練された顔認識システムは、同一人物の異なる画像を比較的近くにマッピングできるはずです。ここでは3人の個人の画像をそれぞれ15枚ずつ読み込みます(もしかしたら知っている人かもしれません—そうするとあなたの脳が顔認識にかなり優れていることがわかります)。
画像を表示した後、変換を行います。MTCNN(githubリポジトリ)が顔を検出し、顔の周囲を切り抜きます。その後、すべての画像をテンソルにまとめます。
# @title Display Images
# @markdown Here are the source images of Bruce Lee, Neil Patrick Harris, and Pam Grier
train_transform = transforms.Compose((transforms.Resize((256, 256)),
                                      transforms.ToTensor()))

face_dataset = ImageFolder('faces', transform=train_transform)

image_count = len(face_dataset)

face_loader = torch.utils.data.DataLoader(face_dataset,
                                          batch_size=45,
                                          shuffle=False)

dataiter = iter(face_loader)
images, labels = next(dataiter)

# Show images
plt.figure(figsize=(15, 15))
plt.imshow(make_grid(images, nrow=15).permute(1, 2, 0))
plt.axis('off')
plt.show()
# @title Image Preprocessing Function
def process_images(image_dir: str, size=256):
"""
This function returns two tensors for the
given image dir: one usable for inputting into the
facenet model, and one that is [0,1] scaled for
visualizing
Parameters:
image_dir: string
The glob corresponding to images in a directory
size: int
Size [default: 256]
Returns:
model_tensor: torch.tensor
A image_count x channels x height x width
tensor scaled to between -1 and 1,
with the faces detected and cropped to the center
using mtcnn
display_tensor: torch.tensor
A transformed version of the model
tensor scaled to between 0 and 1
"""
mtcnn = MTCNN(image_size=size, margin=32)
images = []
for img_path in glob.glob(image_dir):
img = Image.open(img_path)
# Normalize and crop image
img_cropped = mtcnn(img)
images.append(img_cropped)
model_tensor = torch.stack(images)
display_tensor = model_tensor / (model_tensor.max() * 2)
display_tensor += .5
return model_tensor, display_tensor画像を読み込んだので、前処理を行います。ネットワークが学習しやすいように、顔部分だけを切り抜きます。
bruce_tensor, bruce_display = process_images('faces/bruce/*.jpg')
neil_tensor, neil_display = process_images('faces/neil/*.jpg')
pam_tensor, pam_display = process_images('faces/pam/*.jpg')

tensor_to_display = torch.cat((bruce_display, neil_display, pam_display))

plt.figure(figsize=(15, 15))
plt.imshow(make_grid(tensor_to_display, nrow=15).permute(1, 2, 0))
plt.axis('off')
plt.show()
セクション1.3:事前学習済みネットワークによる埋め込み
FaceNetという事前学習済みの顔認識モデルを読み込みます。このモデルは、9131人の個人の331万枚の画像を含むVGGFace2$データセットで訓練されています。
この事前学習モデルを使って、入力画像すべての埋め込みを計算します。
resnet = InceptionResnetV1(pretrained='vggface2').eval().to(DEVICE)# Calculate embedding
resnet.classify = False
bruce_embeddings = resnet(bruce_tensor.to(DEVICE))
neil_embeddings = resnet(neil_tensor.to(DEVICE))
pam_embeddings = resnet(pam_tensor.to(DEVICE))考えてみよう!1.3:埋め込みベクトル
モデルが画像を受け取り対応する埋め込みベクトルを返すときに何が起きているか理解しましょう。
- 1枚の入力画像の高さ、幅、チャンネル数は?
- 画像のスタック(例:bruce_tensor)の次元は?
- 対応する埋め込み(例:bruce_embeddings)の次元は?
- 1枚の入力画像の埋め込みの次元は?
ヒント:
- 変数名をダブルクリックしてホバーするとテンソルの次元が見られます。
- 質問の順番通りに答える必要はありません。
# @title Submit your feedback
content_review(f"{feedback_prefix}_Embedding_vectors_Discussion")
512次元のベクトルを視覚的に表示することはできませんが、**主成分分析(PCA)**を用いて512次元を2次元空間に射影し、データの変動を最大限に保ったまま可視化できます。これは概念を理解するための視覚的補助です。もし2つの画像間の距離などの計算をしたい場合は、512次元の埋め込みベクトル全体を用いて計算します。
embedding_tensor = torch.cat((bruce_embeddings,
                              neil_embeddings,
                              pam_embeddings)).to(device='cpu')

pca = sklearn.decomposition.PCA(n_components=2)
pca_tensor = pca.fit_transform(embedding_tensor.detach().cpu().numpy())
num = 15
categs = 3
colors = ['blue', 'orange', 'magenta']
labels = ['Bruce Lee', 'Neil Patrick Harris', 'Pam Grier']
markers = ['o', 'x', 's']
plt.figure(figsize=(8, 8))
for i in range(categs):
plt.scatter(pca_tensor[i*num:(i+1)*num, 0],
pca_tensor[i*num:(i+1)*num, 1],
c=colors[i],
marker=markers[i], label=labels[i])
plt.legend()
plt.title('PCA Representation of the Image Embeddings')
plt.xlabel('PC 1')
plt.ylabel('PC 2')
plt.show()素晴らしい!各個人に対応する画像は埋め込み空間で互いに離れて分離されています!
もしニール・パトリック・ハリスが顔認識でスマホのロックを解除したい場合、スマホはカメラから画像を取得し、埋め込みを計算して、登録済みのニール・パトリック・ハリスの埋め込みに近いかどうかを確認します。
セクション2:倫理 — 事前学習データセットによるバイアス/差別
所要時間の目安:約19分
VGGFace2やCASIA-WebFaceのような人気の顔認識データセットは主に白人の顔で構成されています。
その結果、最先端の顔認識モデルでも他の人種の顔を認識しようとすると大幅に性能が劣る$ことがあります。
セキュリティや刑事司法の分野でモデルの性能が悪いことがもたらす影響を考えると、顔認識システムを構築する際にはこれらの限界を認識することが非常に重要です。
この例では、UTKFaceデータセットの小さなサブセットを使います。黒人女性の画像49枚と白人女性の画像49枚です。チュートリアル1のセクション8で使ったのと同じ事前学習済みモデルを用いて、モデルが不均衡なデータセットで訓練された結果を見て議論します。
# @title Video 2: Ethical aspects
from ipywidgets import widgets
from IPython.display import YouTubeVideo
from IPython.display import IFrame
from IPython.display import display


class PlayVideo(IFrame):
  def __init__(self, id, source, page=1, width=400, height=300, **kwargs):
    self.id = id
    if source == 'Bilibili':
      src = f'https://player.bilibili.com/player.html?bvid={id}&page={page}'
    elif source == 'Osf':
      src = f'https://mfr.ca-1.osf.io/render?url=https://osf.io/download/{id}/?direct%26mode=render'
    super(PlayVideo, self).__init__(src, width, height, **kwargs)


def display_videos(video_ids, W=400, H=300, fs=1):
  tab_contents = []
  for i, video_id in enumerate(video_ids):
    out = widgets.Output()
    with out:
      if video_ids[i][0] == 'Youtube':
        video = YouTubeVideo(id=video_ids[i][1], width=W,
                             height=H, fs=fs, rel=0)
        print(f'Video available at https://youtube.com/watch?v={video.id}')
      else:
        video = PlayVideo(id=video_ids[i][1], source=video_ids[i][0], width=W,
                          height=H, fs=fs, autoplay=False)
        if video_ids[i][0] == 'Bilibili':
          print(f'Video available at https://www.bilibili.com/video/{video.id}')
        elif video_ids[i][0] == 'Osf':
          print(f'Video available at https://osf.io/{video.id}')
      display(video)
    tab_contents.append(out)
  return tab_contents


video_ids = [('Youtube', 'vYilJV3PqUM'), ('Bilibili', 'BV1Jo4y1Q7K3')]
tab_contents = display_videos(video_ids, W=854, H=480)
tabs = widgets.Tab()
tabs.children = tab_contents
for i in range(len(tab_contents)):
  tabs.set_title(i, video_ids[i][0])
display(tabs)
# @title Submit your feedback
content_review(f"{feedback_prefix}_Ethical_aspects_Video")セクション2.1:データのダウンロード
# @title Run this cell to get the data

# Original link: https://github.com/richardvogg/face_sample.git
url = 'https://osf.io/36wyh/download'
fname = 'face_sample2'

if not os.path.exists(fname+'zip'):
  print("Data is being downloaded...")
  r = requests.get(url, stream=True)
  z = zipfile.ZipFile(io.BytesIO(r.content))
  z.extractall()
  print("The download has been completed.")
else:
  print("Data has already been downloaded.")
セクション2.2:データの読み込み、表示、変換
black_female_tensor, black_female_display = process_images('face_sample2/??_1_1_*.jpg', size=150)
white_female_tensor, white_female_display = process_images('face_sample2/??_1_0_*.jpg', size=150)これらのテンソルの次元を確認すると、各グループに対してサイズ、3チャンネル(RGB)の49枚の画像があることがわかります。
注意: 元の画像サイズはでしたが、RAMの制約により縮小しています。必要に応じてsize=200に戻せます。
print(white_female_tensor.shape)
print(black_female_tensor.shape)
# @title Visualize some example faces
tensor_to_display = torch.cat((white_female_display[:15],
black_female_display[:15]))
plt.figure(figsize=(12, 12))
plt.imshow(make_grid(tensor_to_display, nrow = 15).permute(1, 2, 0))
plt.axis('off')
plt.show()セクション2.3:埋め込みの計算
セクション8と同じ事前学習済み顔認識ネットワークを使って埋め込みを計算します。メモリ不足が起きる場合は、編集 > ノートブックの設定でGPUがハードウェアアクセラレータとして選択されているか確認してください。それでも改善しない場合は、ノートブックを再起動し、ランタイム -> ランタイムを再起動を試してください。
resnet.classify = False
black_female_embeddings = resnet(black_female_tensor.to(DEVICE))
white_female_embeddings = resnet(white_female_tensor.to(DEVICE))埋め込みを使って、モデルが不均衡なデータセットで訓練されたことを示します。これには、画像のすべての組み合わせの距離行列を計算します。小さな例(、ここでは)を示します。
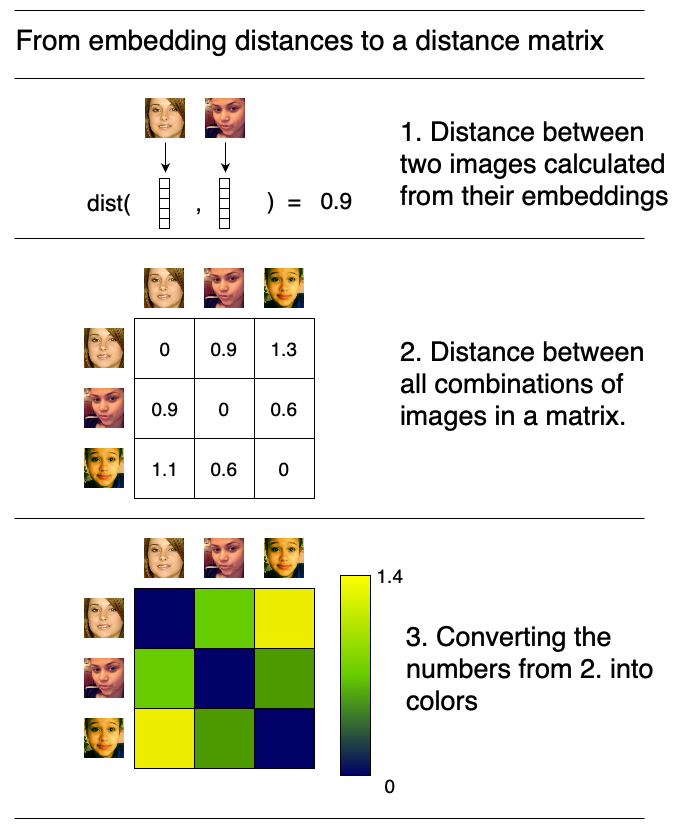
テンソル内の各画像埋め込みペア間の距離を計算し、すべての距離を可視化します。埋め込みはベクトルであり、2つのベクトル間の距離はユークリッド距離です。
# @title Function to calculate pairwise distances

# @markdown [`torch.cdist`](https://pytorch.org/docs/stable/generated/torch.cdist.html) is used

def calculate_pairwise_distances(embedding_tensor):
  """
  This function calculates the distance
  between each pair of image embeddings
  in a tensor using the `torch.cdist`.

  Parameters:
    embedding_tensor : torch.Tensor
      A num_images x embedding_dimension tensor

  Returns:
    distances : torch.Tensor
      A num_images x num_images tensor
      containing the pairwise distances between
      each to image embedding
  """

  distances = torch.cdist(embedding_tensor, embedding_tensor)

  return distances
# @title Visualize the distances
embedding_tensor = torch.cat((black_female_embeddings,
white_female_embeddings)).to(device='cpu')
distances = calculate_pairwise_distances(embedding_tensor)
plt.figure(figsize=(8, 8))
plt.imshow(distances.detach().cpu().numpy())
plt.annotate('Black female', (2, -0.5), fontsize=20, va='bottom')
plt.annotate('White female', (52, -0.5), fontsize=20, va='bottom')
plt.annotate('Black female', (-0.5, 45), fontsize=20, rotation=90, ha='right')
plt.annotate('White female', (-0.5, 90), fontsize=20, rotation=90, ha='right')
cbar = plt.colorbar()
cbar.set_label('Distance', fontsize=16)
plt.axis('off')
plt.show()演習2.1:顔の類似度
何が観察されますか?顔認識アルゴリズムにおいて、どのグループの顔がより類似しているように見えますか?
# @title Submit your feedback
content_review(f"{feedback_prefix}_Face_Similarity_Discussion")
演習2.2:埋め込み
- あるグループの埋め込み間の距離が小さいことは、実際の応用で何を意味しますか?
- これが悪影響を及ぼす例や状況を考えられますか?
- これらの問題を避けるために何ができるでしょうか?
# @title Submit your feedback
content_review(f"{feedback_prefix}_Embeddings_Discussion")最後に、モデルの事前学習に使うデータセットの重要性を示すために、白人男性と女性が異なる埋め込み空間でどれだけの領域を占めているかを見てみましょう。FairFaceは完全にバランスの取れたクラスで特別に作成されたデータセットです。すべての可視化で青い点は白人男性と白人女性を示しています。

出典:Kärkkäinen and Joo, 2019, arXiv
セクション3:群内平方和(Within Sum of Squares)
所要時間の目安:約10分
この観察を数値化してみましょう。埋め込みを使って作業します。
各グループのセントロイド(中心点)を計算します。これはグループの49個の埋め込みの平均です。各埋め込みベクトルは512次元なので、セントロイドも512次元になります。
次に、各グループの観測値がセントロイドからどれだけ離れているかを計算します。これはクラスタ分析でいう群内平方和(Within Sum of Squares, WSS)として知られる概念です。
ここではユークリッドノルムです。
群内平方和(WSS)は埋め込み空間におけるグループのばらつきを測る数値です。もしあるグループのすべての埋め込みが非常に近ければ、WSSは非常に小さくなります。今回の例では、黒人女性のWSSは白人女性よりもかなり小さいことがわかりました。これはモデルが黒人女性2人を区別するのが白人女性2人を区別するよりも難しいことを意味します。このWSSの結果は、距離行列で観察した黒人女性間のペアワイズ距離が全体的に小さいという観察を補完しています。
# @title Function to calculate WSS

def wss(group):
  """
  This function returns the sum of squared distances
  of the N vectors of a
  group tensor (N x K) to its centroid (1 x K).
   Hints:
    - to calculate the centroid, torch.mean()
      will be of use.
    - We need the mean of the N=49 observations.
      If our input tensor is of size
      N x K, we expect the centroid to be of
      dimensions 1 x K.
      Use the axis argument within torch.mean

  Args:
    group: torch.tensor
      A image_count x embedding_size tensor

  Returns:
    sum_sq: torch.tensor
      A 1x1 tensor with the sum of squared distances.
    """

  centroid = torch.mean(group, axis=0)
  distance = torch.linalg.norm(group - centroid.view(1, -1), axis=1)
  sum_sq = torch.sum(distance**2)
  return sum_sq
# @markdown Let's calculate the WSS for the two groups of our example.
print(f"Black female embedding WSS: {np.round(wss(black_female_embeddings).item(), 2)}")
print(f"White female embedding WSS: {np.round(wss(white_female_embeddings).item(), 2)}")まとめ
このチュートリアルでは、最新の畳み込みネットワークを実際の応用例である顔認識に適用する方法を学びました。しかし、最先端の顔認識ツールは主に白人の顔で訓練されているため、他の人種の顔に対しては性能が低下したり、うまく機能しないことがあることも理解しました。