![]()

ボーナスチュートリアル: ニューラルネットワークをウェブ上にデプロイする
Neuromatch Academyによる
コンテンツ作成者: Sam Ray, Vladimir Haltakov, Konrad Kording
制作編集者: Spiros Chavlis
チュートリアルの目的
このチュートリアルでは、最新のフレームワークやライブラリを使って、ディープラーニングモデルをウェブアプリケーションとしてデプロイする基本を学びます。以下のことを習得します:
- Flaskでウェブページを提供する
- MVVMデザインパターンを適用して保守性の高いコードを書く
- サービスのインタラクティブなUIを作成する
- ディープラーニングモデルをREST APIとしてデプロイする
- Heroku上にアプリケーションをデプロイする
# @title Tutorial slides
from IPython.display import IFrame
link_id = "p6wty"
print(f"If you want to download the slides: https://osf.io/download/{link_id}/")
IFrame(src=f"https://mfr.ca-1.osf.io/render?url=https://osf.io/{link_id}/?direct%26mode=render%26action=download%26mode=render", width=854, height=480)
セットアップ
以下のセルを実行して重要な依存関係をインストールし、読み込みます。
# @title Install dependencies# @title Install and import feedback gadget
from vibecheck import DatatopsContentReviewContainer
def content_review(notebook_section: str):
return DatatopsContentReviewContainer(
"", # No text prompt
notebook_section,
{
"url": "https://pmyvdlilci.execute-api.us-east-1.amazonaws.com/klab",
"name": "neuromatch_dl",
"user_key": "f379rz8y",
},
).render()
feedback_prefix = "Bonus_DeplooyModels"# @title Modified functions from the `flask-ngrok` package which doesn't work with the latest version of `ngrok`
import time
import json
import atexit
import requests
import subprocess
from threading import Timer
def _run_ngrok(port):
ngrok = subprocess.Popen(["ngrok", 'http', str(port)])
atexit.register(ngrok.terminate)
localhost_url = "http://localhost:4040/api/tunnels" # Url with tunnel details
time.sleep(1)
tunnel_url = requests.get(localhost_url).text # Get the tunnel information
j = json.loads(tunnel_url)
tunnel_url = j['tunnels'][0]['public_url'] # Do the parsing of the get
return tunnel_url
def start_ngrok(port):
ngrok_address = _run_ngrok(port)
print(f" * Running on {ngrok_address}")
print(f" * Traffic stats available on http://127.0.0.1:4040")
def run_with_ngrok(app):
"""
The provided Flask app will be securely exposed to the public internet
via ngrok when run, and the its ngrok address will be printed to stdout
:param app: a Flask application object
:return: None
"""
old_run = app.run
def new_run(*args, **kwargs):
port = kwargs.get('port', 5000)
thread = Timer(1, start_ngrok, args=(port,))
thread.setDaemon(True)
thread.start()
old_run(*args, **kwargs)
app.run = new_run# Imports
import io
import platform
from PIL import Image
from urllib.request import urlopen
import flasgger
from flask_restful import Api
from flask_restful import Resource, fields, marshal
from flask import Flask, render_template_string, request, redirect
import torch
from torchvision import models
import torchvision.transforms as transformsngrokのセットアップ
ノートブック内で動作するウェブアプリにアクセスできるようにするために、ngrokというサービスを使います。最近では、ngrokを使うには無料アカウントの登録と認証トークンの設定が必要になりました。以下の手順で設定してください。
- ngrok.com にアクセスして無料アカウントを作成します。登録後すぐにメールアドレスの確認を忘れずに行ってください。
- dashboard.ngrok.com/get-started/your-authtoken にアクセスして認証トークンをコピーします。
- 下のセルの
YOUR_NGROK_AUTHTOKENをコピーしたトークンに置き換え、最後の行のコメントを外して実行します。
以下のような出力が表示されるはずです:
Authtoken saved to configuration file: /root/.ngrok2/ngrok.yml
# Paste your ngrok authtoken below and run the cell

## Uncomment the line below
# !ngrok authtoken YOUR_NGROK_AUTHTOKEN
注意: もしアカウントを削除したい場合は、こちらのページ here にアクセスし、ページ下部の Delete User をクリックしてください。
セクション1: はじめに
# @title Video 1: Deploying Neural Networks on the Web
from ipywidgets import widgets
from IPython.display import YouTubeVideo
from IPython.display import IFrame
from IPython.display import display


class PlayVideo(IFrame):
  def __init__(self, id, source, page=1, width=400, height=300, **kwargs):
    self.id = id
    if source == 'Bilibili':
      src = f'https://player.bilibili.com/player.html?bvid={id}&page={page}'
    elif source == 'Osf':
      src = f'https://mfr.ca-1.osf.io/render?url=https://osf.io/download/{id}/?direct%26mode=render'
    super(PlayVideo, self).__init__(src, width, height, **kwargs)


def display_videos(video_ids, W=400, H=300, fs=1):
  tab_contents = []
  for i, video_id in enumerate(video_ids):
    out = widgets.Output()
    with out:
      if video_ids[i][0] == 'Youtube':
        video = YouTubeVideo(id=video_ids[i][1], width=W,
                             height=H, fs=fs, rel=0)
        print(f'Video available at https://youtube.com/watch?v={video.id}')
      else:
        video = PlayVideo(id=video_ids[i][1], source=video_ids[i][0], width=W,
                          height=H, fs=fs, autoplay=False)
        if video_ids[i][0] == 'Bilibili':
          print(f'Video available at https://www.bilibili.com/video/{video.id}')
        elif video_ids[i][0] == 'Osf':
          print(f'Video available at https://osf.io/{video.id}')
      display(video)
    tab_contents.append(out)
  return tab_contents


video_ids = [('Youtube', 'yQtPGtz4jDI'), ('Bilibili', 'BV1754y1E7Qf')]
tab_contents = display_videos(video_ids, W=854, H=480)
tabs = widgets.Tab()
tabs.children = tab_contents
for i in range(len(tab_contents)):
  tabs.set_title(i, video_ids[i][0])
display(tabs)
# @title Submit your feedback
content_review(f"{feedback_prefix}_Deploying_Neural_Networks_on_the_Web_Video")まずはFlaskでシンプルなウェブアプリケーションを作成します。このアプリはチュートリアルを通して拡張していきます。最終的には、画像をアップロードするとニューラルネットワークモデルが自動で分類してくれるウェブアプリが完成します。
セクション2: Flask
FlaskはPythonで作られたウェブアプリケーションのマイクロフレームワークです。軽量で使いやすく、拡張性が高いことから人気があります。現在ではウェブアプリケーション、REST API、ソケットベースのサービスなど様々な用途で使われており、LinkedInやPinterestなどの企業でも採用されています。
このセクションでは、シンプルなFlaskウェブサイトの作成方法を学びます。
セクション2.1: あなたの最初のFlaskアプリ
# @title Video 2: Flask
from ipywidgets import widgets
from IPython.display import YouTubeVideo
from IPython.display import IFrame
from IPython.display import display


class PlayVideo(IFrame):
  def __init__(self, id, source, page=1, width=400, height=300, **kwargs):
    self.id = id
    if source == 'Bilibili':
      src = f'https://player.bilibili.com/player.html?bvid={id}&page={page}'
    elif source == 'Osf':
      src = f'https://mfr.ca-1.osf.io/render?url=https://osf.io/download/{id}/?direct%26mode=render'
    super(PlayVideo, self).__init__(src, width, height, **kwargs)


def display_videos(video_ids, W=400, H=300, fs=1):
  tab_contents = []
  for i, video_id in enumerate(video_ids):
    out = widgets.Output()
    with out:
      if video_ids[i][0] == 'Youtube':
        video = YouTubeVideo(id=video_ids[i][1], width=W,
                             height=H, fs=fs, rel=0)
        print(f'Video available at https://youtube.com/watch?v={video.id}')
      else:
        video = PlayVideo(id=video_ids[i][1], source=video_ids[i][0], width=W,
                          height=H, fs=fs, autoplay=False)
        if video_ids[i][0] == 'Bilibili':
          print(f'Video available at https://www.bilibili.com/video/{video.id}')
        elif video_ids[i][0] == 'Osf':
          print(f'Video available at https://osf.io/{video.id}')
      display(video)
    tab_contents.append(out)
  return tab_contents


video_ids = [('Youtube', 'uVqu-9IBIRg'), ('Bilibili', 'BV1sA411P7Rq')]
tab_contents = display_videos(video_ids, W=854, H=480)
tabs = widgets.Tab()
tabs.children = tab_contents
for i in range(len(tab_contents)):
  tabs.set_title(i, video_ids[i][0])
display(tabs)
# @title Submit your feedback
content_review(f"{feedback_prefix}_Flask_Video")最小限のFlaskアプリを作るのはとても簡単です。Flaskオブジェクトを作成し、ルートURLのハンドラを定義してHTMLレスポンスを返します。アプリケーションのモジュールやパッケージを指定する必要がありますが、__name__を便利なショートカットとして使えます。
ノートブック内でアプリを動かすために少し工夫が必要です。単にアプリを実行すると、http://127.0.0.1:5000でアクセス可能になりますが、これはノートブックが動いているサーバーのローカルアドレスなので外部からアクセスできません。ここでngrokが役立ちます。ngrokはノートブックサーバーから外部へのトンネルを作成します。アプリをテストするときは必ずngrokのURLを使ってください。
下のapp.run()のコメントを外して実行すると、以下のような出力が表示されます:
 * Serving Flask app "__main__" (lazy loading)
 * Environment: production
   WARNING: This is a development server. Do not use it in a production deployment.
   Use a production WSGI server instead.
 * Debug mode: off
 * Running on http://127.0.0.1:5000/ (Press CTRL+C to quit)
 * Running on https://XXX-XX-XX-XXX-XXX.ngrok.io
 * Traffic stats available on http://127.0.0.1:4040
アクセスすべきURLは:https://XXX-XX-XX-XXX-XXX.ngrok.io
注意:
app.run()の呼び出しは自動で終了しません。次のセルに進みたいときは、実行中のセルを停止してください。セルの実行停止ボタンを押すか、settings>Interrupt runtime または Ctrl+M+I で停止できます。
警告: 「サイトを訪問」オプションが動作しない場合はURLを確認してください。
ngrokは一部のリンクをhttpsからhttpにリダイレクトするため、手動で変更する必要があります!
# Create a Flask app object
app = Flask(__name__)

# Define a function to be called when the user accesses the root URL (/)
# Handler
@app.route("/")
def home():
  # Return a very simple HTML response
  return "<h1>Welcome to Neuromatch</h1>"


# You need ngrok to expose the Flask app outside of the notebook
run_with_ngrok(app)

## Uncomment below to run the app
# app.run()
セクション2.2: Jinja2テンプレートの使用
# @title Video 3: Jinja Templates
from ipywidgets import widgets
from IPython.display import YouTubeVideo
from IPython.display import IFrame
from IPython.display import display


class PlayVideo(IFrame):
  def __init__(self, id, source, page=1, width=400, height=300, **kwargs):
    self.id = id
    if source == 'Bilibili':
      src = f'https://player.bilibili.com/player.html?bvid={id}&page={page}'
    elif source == 'Osf':
      src = f'https://mfr.ca-1.osf.io/render?url=https://osf.io/download/{id}/?direct%26mode=render'
    super(PlayVideo, self).__init__(src, width, height, **kwargs)


def display_videos(video_ids, W=400, H=300, fs=1):
  tab_contents = []
  for i, video_id in enumerate(video_ids):
    out = widgets.Output()
    with out:
      if video_ids[i][0] == 'Youtube':
        video = YouTubeVideo(id=video_ids[i][1], width=W,
                             height=H, fs=fs, rel=0)
        print(f'Video available at https://youtube.com/watch?v={video.id}')
      else:
        video = PlayVideo(id=video_ids[i][1], source=video_ids[i][0], width=W,
                          height=H, fs=fs, autoplay=False)
        if video_ids[i][0] == 'Bilibili':
          print(f'Video available at https://www.bilibili.com/video/{video.id}')
        elif video_ids[i][0] == 'Osf':
          print(f'Video available at https://osf.io/{video.id}')
      display(video)
    tab_contents.append(out)
  return tab_contents


video_ids = [('Youtube', 'u25FfNIAKsg'), ('Bilibili', 'BV1Mb4y167eg')]
tab_contents = display_videos(video_ids, W=854, H=480)
tabs = widgets.Tab()
tabs.children = tab_contents
for i in range(len(tab_contents)):
  tabs.set_title(i, video_ids[i][0])
display(tabs)
# @title Submit your feedback
content_review(f"{feedback_prefix}_Jinja_Templates_Video")FlaskのデフォルトテンプレートエンジンはJinja2です。Jinja2は継承、データの人間向けフォーマット(拡張機能あり)、コンポーネントのサブモジュール分割など、きれいで再利用可能なテンプレートを書くための機能を提供します。
このセクションでは、アプリにJinja2テンプレートを追加します。Jinja2ではHTMLコード内で変数やif文、ループなどの制御構文を使えます。Pythonコードからテンプレートへデータを渡してレンダリングできます。
まず、プラットフォームのプロパティを表示するシンプルなウェブページのテンプレートを定義しましょう。platform辞書のキーと値をループで回します:
{% for key, value in platform.items() %}
辞書の要素ごとにHTMLテーブルの行が作られます。変数の中身はこのように表示できます:{{ value }}
# Jinja2 HTML template
template_str = '''
<html lang="en">
    <body>
        <div style="width: 50%; margin: 100px auto">
            <h1>Platform Info</h1>
            <table>
                <tr style="width:">
                    <th style="width: 200px">Property</th>
                    <th>Value</th>
                </tr>

                {% for key, value in platform.items() %}
                <tr>
                    <td style="width: 200px">{{ key }}</td>
                    <td>{{ value }}</td>
                </tr>
                {% endfor %}

            </table>
        </div>
    </body>
</html>
'''platformパッケージを使って取得したプラットフォームのプロパティを渡してテンプレートをレンダリングできます。
app = Flask(__name__)

@app.route("/")
def home():
  # Get the platform properties as a dict
  properties = platform.uname()._asdict()

  # Render the Jinja2 template
  return render_template_string(template_str, platform=properties)


run_with_ngrok(app)

## Uncomment below to run the app
# app.run()
セクション2.3: MVVMデザインパターンの適用
# @title Video 4: Using the MVVM Design Pattern
from ipywidgets import widgets
from IPython.display import YouTubeVideo
from IPython.display import IFrame
from IPython.display import display


class PlayVideo(IFrame):
  def __init__(self, id, source, page=1, width=400, height=300, **kwargs):
    self.id = id
    if source == 'Bilibili':
      src = f'https://player.bilibili.com/player.html?bvid={id}&page={page}'
    elif source == 'Osf':
      src = f'https://mfr.ca-1.osf.io/render?url=https://osf.io/download/{id}/?direct%26mode=render'
    super(PlayVideo, self).__init__(src, width, height, **kwargs)


def display_videos(video_ids, W=400, H=300, fs=1):
  tab_contents = []
  for i, video_id in enumerate(video_ids):
    out = widgets.Output()
    with out:
      if video_ids[i][0] == 'Youtube':
        video = YouTubeVideo(id=video_ids[i][1], width=W,
                             height=H, fs=fs, rel=0)
        print(f'Video available at https://youtube.com/watch?v={video.id}')
      else:
        video = PlayVideo(id=video_ids[i][1], source=video_ids[i][0], width=W,
                          height=H, fs=fs, autoplay=False)
        if video_ids[i][0] == 'Bilibili':
          print(f'Video available at https://www.bilibili.com/video/{video.id}')
        elif video_ids[i][0] == 'Osf':
          print(f'Video available at https://osf.io/{video.id}')
      display(video)
    tab_contents.append(out)
  return tab_contents


video_ids = [('Youtube', '13bFN4L6c9I'), ('Bilibili', 'BV1YA411P766')]
tab_contents = display_videos(video_ids, W=854, H=480)
tabs = widgets.Tab()
tabs.children = tab_contents
for i in range(len(tab_contents)):
  tabs.set_title(i, video_ids[i][0])
display(tabs)
# @title Submit your feedback
content_review(f"{feedback_prefix}_Using_the_MVVM_Design_Pattern_Video")デザインパターンは再利用可能で適応性があり拡張可能なコードを書くための方法を提供します。デザインパターンはライブラリではなく、ソフトウェア設計時に従うべきベストプラクティスのセットです。
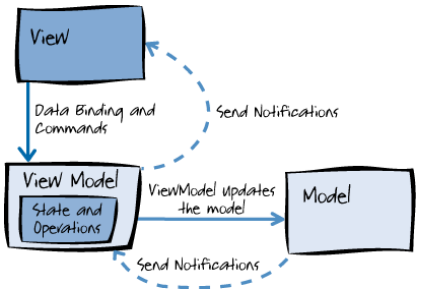
Model View View-Model (MVVM)はウェブアプリケーション(および他のGUIアプリケーション)でよく使われる強力なデザインパターンです。
- View - ユーザーが操作するコード部分(ウェブページ)
- Model - 操作対象のデータの表現
- View-Model - アプリケーションの状態を管理し、Modelのデータを表示に適した形に変換し、またその逆も行う部分
FlaskでMVVMパターンを実装しましょう。まず、2Dポイントの情報を表示するためにMVVMの3つの部分それぞれのクラスを作成します。
class PointModel:
  """
  Simple point Model storing a 2D point
  """

  # Initialize a 2D point
  def __init__(self, x, y):
    self.x = x
    self.y = y


class PointView(Resource):
  """
  Simple View displaying the information about a 2D point
  """

  def get(self):
    point = PointViewModel.get_sample_data()
    return f"Point: (x={point.x}, y={point.y})"


class PointViewModel:
  """
  ViewModel - Simple ViewModel retrieving the data and passing it to the view
  """

  # Create some sample data
  @classmethod
  def get_sample_data(cls):
    return PointModel(2, 5)

  # Register a handler for "/" in the API calling the PointView
  def setup(self, api):
api.add_resource(PointView, '/')Flaskアプリを作成し、Apiオブジェクトを使ってViewModelを登録できます。
# Create a Flask app
app = Flask(__name__)

# Create an Api object where different ViewModels can be registered
api = Api(app)

# Create a PointViewModel and register it to the API
pvm = PointViewModel()
pvm.setup(api)

# Run with ngrok
run_with_ngrok(app)

## Uncomment below to run the app
# app.run()
セクション2.4: REST APIの作成
# @title Video 5: REST API
from ipywidgets import widgets
from IPython.display import YouTubeVideo
from IPython.display import IFrame
from IPython.display import display


class PlayVideo(IFrame):
  def __init__(self, id, source, page=1, width=400, height=300, **kwargs):
    self.id = id
    if source == 'Bilibili':
      src = f'https://player.bilibili.com/player.html?bvid={id}&page={page}'
    elif source == 'Osf':
      src = f'https://mfr.ca-1.osf.io/render?url=https://osf.io/download/{id}/?direct%26mode=render'
    super(PlayVideo, self).__init__(src, width, height, **kwargs)


def display_videos(video_ids, W=400, H=300, fs=1):
  tab_contents = []
  for i, video_id in enumerate(video_ids):
    out = widgets.Output()
    with out:
      if video_ids[i][0] == 'Youtube':
        video = YouTubeVideo(id=video_ids[i][1], width=W,
                             height=H, fs=fs, rel=0)
        print(f'Video available at https://youtube.com/watch?v={video.id}')
      else:
        video = PlayVideo(id=video_ids[i][1], source=video_ids[i][0], width=W,
                          height=H, fs=fs, autoplay=False)
        if video_ids[i][0] == 'Bilibili':
          print(f'Video available at https://www.bilibili.com/video/{video.id}')
        elif video_ids[i][0] == 'Osf':
          print(f'Video available at https://osf.io/{video.id}')
      display(video)
    tab_contents.append(out)
  return tab_contents


video_ids = [('Youtube', 'cIjaEE6tKpk'), ('Bilibili', 'BV1A64y1z74c')]
tab_contents = display_videos(video_ids, W=854, H=480)
tabs = widgets.Tab()
tabs.children = tab_contents
for i in range(len(tab_contents)):
  tabs.set_title(i, video_ids[i][0])
display(tabs)
# @title Submit your feedback
content_review(f"{feedback_prefix}_REST_API_Video")REST(Representational State Transfer)は、サービス間のやり取りを可能にするAPI設計のルールセットです。HTMLページが人間向けのインターフェースであるのに対し、REST APIはコンピュータ向けのインターフェースと考えられます。
一般的なREST APIの実装方法は、特定のリクエストに対して必要なデータを含むJSON文字列を返すことです。
ここでは、プラットフォームのプロパティをJSON形式で提供する新しいViewとViewModelを作成します。
class PlatformView(Resource):
  """
  New view displaying some Platform Properties
  """

  def get(self):
    """
      This examples uses PlatformView Resource
      It works also with swag_from, schemas and spec_dict
      ---
      responses:
        200:
          description: A single Machine item
          schema:
            id: Machine
            properties:
              machine:
                type: string
                description: The type of the processor
                default: None
              node:
                type: string
                description: The name of the current virtual machine
                default: None
              processor:
                type: string
                description: The type of the processor arch
                default: None
              system:
                type: string
                description: The name of the user
                default: None
      """

    # Specification of the returned data
    resource_fields = {
        'system': fields.String,
        'machine': fields.String,
        'processor': fields.String,
        'node': fields.String
    }

    # Serialize the data according to the specification
    return marshal(platform.uname()._asdict(), resource_fields)


class PlatformViewModel:
  """
  A simple ViewModel that displays the PlatformView at /platform
  """

  def setup(self, api):
api.add_resource(PlatformView, '/platform')getメソッド内のドキュメントに注目してください。flasggerパッケージを使うことでREST APIのドキュメントを自動生成できます。/apidocsでアクセス可能です。
# Create the Flask app and register the ViewModel
app = Flask(__name__)
api = Api(app)
pvm = PlatformViewModel()
pvm.setup(api)

# Redirect / to /platform for convenience
@app.route('/')
def redirect_platform():
  return redirect("/platform", code=302)


# Register Swagger to create API documentation at /apidocs
swg = flasgger.Swagger(app)

# Run the app
run_with_ngrok(app)

## Uncomment below to run the app
# app.run()
セクション3: Vue.js
# @title Video 6: Vue.js
from ipywidgets import widgets
from IPython.display import YouTubeVideo
from IPython.display import IFrame
from IPython.display import display


class PlayVideo(IFrame):
  def __init__(self, id, source, page=1, width=400, height=300, **kwargs):
    self.id = id
    if source == 'Bilibili':
      src = f'https://player.bilibili.com/player.html?bvid={id}&page={page}'
    elif source == 'Osf':
      src = f'https://mfr.ca-1.osf.io/render?url=https://osf.io/download/{id}/?direct%26mode=render'
    super(PlayVideo, self).__init__(src, width, height, **kwargs)


def display_videos(video_ids, W=400, H=300, fs=1):
  tab_contents = []
  for i, video_id in enumerate(video_ids):
    out = widgets.Output()
    with out:
      if video_ids[i][0] == 'Youtube':
        video = YouTubeVideo(id=video_ids[i][1], width=W,
                             height=H, fs=fs, rel=0)
        print(f'Video available at https://youtube.com/watch?v={video.id}')
      else:
        video = PlayVideo(id=video_ids[i][1], source=video_ids[i][0], width=W,
                          height=H, fs=fs, autoplay=False)
        if video_ids[i][0] == 'Bilibili':
          print(f'Video available at https://www.bilibili.com/video/{video.id}')
        elif video_ids[i][0] == 'Osf':
          print(f'Video available at https://osf.io/{video.id}')
      display(video)
    tab_contents.append(out)
  return tab_contents


video_ids = [('Youtube', 'PD6l9pkjw-c'), ('Bilibili', 'BV1Yv411K7GS')]
tab_contents = display_videos(video_ids, W=854, H=480)
tabs = widgets.Tab()
tabs.children = tab_contents
for i in range(len(tab_contents)):
  tabs.set_title(i, video_ids[i][0])
display(tabs)
# @title Submit your feedback
content_review(f"{feedback_prefix}_Vue.js_Video")すでにMVVMパターンについて触れ、バックエンドフレームワークのFlaskで実装しました。フロントエンドでも同じパターンを適用すると、動的なアプリケーション作成に役立ちます。
Vue.jsはMVVMデザインパターンを実装した優れたフロントエンドライブラリです。ユーザーインターフェースやシングルページアプリケーションの作成に広く使われています。
このセクションでは、前のセクションで作成したプラットフォームREST APIからデータを取得するシンプルなVue.jsフロントエンドの実装方法を学びます。
セクション3.1: Vueテンプレートの定義
HTMLテンプレートはJinjaと似た形で定義します。大きな違いは、Vueテンプレートはページ読み込み後に動的にレンダリングされるのに対し、Jinjaテンプレートはバックエンドでレンダリングされてからページが提供される点です。
変数の使い方はJinjaに似ていますが、JavaScriptコードでアプリケーションの状態管理やデータバインディングを行います。Vueが初期化(マウント)されたときに、axiosパッケージを使ってプラットフォームREST APIからデータを取得できます。
vue_template = """
<html>
    <head>
        <script src="https://cdn.jsdelivr.net/npm/vue/dist/vue.js"></script>
        <script src="https://cdnjs.cloudflare.com/ajax/libs/axios/0.21.1/axios.min.js"></script>
    </head>
    <body>

        <div id="app">
            <ul>
                <li><strong>System:    </strong>{{ platform.system }}</li>
                <li><strong>Machine:   </strong>{{ platform.machine }}</li>
                <li><strong>Processor: </strong>{{ platform.processor }}</li>
                <li><strong>Node:      </strong>{{ platform.node }}</li>
            </ul>
        </div>

        <script >
            var app = new Vue({
                el: '#app',
                data() {
                    return {
                        platform: null
                    }
                },
                mounted () {
                    axios.get('/platform')
                      .then(response => (this.platform = response.data))
                }
            });
        </script>

    </body>
</html>
"""
セクション 3.2: Vue.js アプリの提供
Flask アプリを再度実行して、ルート URL から Vue テンプレートを提供できます。バックエンドのロジック実装とプラットフォームの REST API 提供には引き続き Flask を使用しています。
この方法は少し複雑に見えるかもしれませんが、動的であるという利点があります。次のセクションでは、動的な機能を追加します。
# Create the Flask app with the previously defined platform API
app = Flask(__name__)
api = Api(app)
# Serve the Platform REST API
pvm = PlatformViewModel()
pvm.setup(api)
swg = flasgger.Swagger(app)

# Serve the Vue template page at /
@app.route("/")
def home():
  return vue_template


# Run the app
run_with_ngrok(app)

## Uncomment below to run the app
# app.run()
セクション 4: モデルの提示
# @title Video 7: Deploying a PyTorch model
from ipywidgets import widgets
from IPython.display import YouTubeVideo
from IPython.display import IFrame
from IPython.display import display


class PlayVideo(IFrame):
  def __init__(self, id, source, page=1, width=400, height=300, **kwargs):
    self.id = id
    if source == 'Bilibili':
      src = f'https://player.bilibili.com/player.html?bvid={id}&page={page}'
    elif source == 'Osf':
      src = f'https://mfr.ca-1.osf.io/render?url=https://osf.io/download/{id}/?direct%26mode=render'
    super(PlayVideo, self).__init__(src, width, height, **kwargs)


def display_videos(video_ids, W=400, H=300, fs=1):
  tab_contents = []
  for i, video_id in enumerate(video_ids):
    out = widgets.Output()
    with out:
      if video_ids[i][0] == 'Youtube':
        video = YouTubeVideo(id=video_ids[i][1], width=W,
                             height=H, fs=fs, rel=0)
        print(f'Video available at https://youtube.com/watch?v={video.id}')
      else:
        video = PlayVideo(id=video_ids[i][1], source=video_ids[i][0], width=W,
                          height=H, fs=fs, autoplay=False)
        if video_ids[i][0] == 'Bilibili':
          print(f'Video available at https://www.bilibili.com/video/{video.id}')
        elif video_ids[i][0] == 'Osf':
          print(f'Video available at https://osf.io/{video.id}')
      display(video)
    tab_contents.append(out)
  return tab_contents


video_ids = [('Youtube', '6UCLk37XWDs'), ('Bilibili', 'BV1Zb4y1z7aT')]
tab_contents = display_videos(video_ids, W=854, H=480)
tabs = widgets.Tab()
tabs.children = tab_contents
for i in range(len(tab_contents)):
  tabs.set_title(i, video_ids[i][0])
display(tabs)
# @title Submit your feedback
content_review(f"{feedback_prefix}_Deploying_a_PyTorch_model_Video")ついにニューラルネットワークをデプロイするためのすべてのツールが揃いました!事前学習済みの DenseNet モデルを使用します。最初のステップでは、画像を入力として受け取り分類する API エントリポイントを作成します。その後、より簡単に操作できる動的な UI を作成します。
セクション 4.1: 画像分類 API
# @title Video 8: Classification with a Pre-trained Model
from ipywidgets import widgets
from IPython.display import YouTubeVideo
from IPython.display import IFrame
from IPython.display import display


class PlayVideo(IFrame):
  def __init__(self, id, source, page=1, width=400, height=300, **kwargs):
    self.id = id
    if source == 'Bilibili':
      src = f'https://player.bilibili.com/player.html?bvid={id}&page={page}'
    elif source == 'Osf':
      src = f'https://mfr.ca-1.osf.io/render?url=https://osf.io/download/{id}/?direct%26mode=render'
    super(PlayVideo, self).__init__(src, width, height, **kwargs)


def display_videos(video_ids, W=400, H=300, fs=1):
  tab_contents = []
  for i, video_id in enumerate(video_ids):
    out = widgets.Output()
    with out:
      if video_ids[i][0] == 'Youtube':
        video = YouTubeVideo(id=video_ids[i][1], width=W,
                             height=H, fs=fs, rel=0)
        print(f'Video available at https://youtube.com/watch?v={video.id}')
      else:
        video = PlayVideo(id=video_ids[i][1], source=video_ids[i][0], width=W,
                          height=H, fs=fs, autoplay=False)
        if video_ids[i][0] == 'Bilibili':
          print(f'Video available at https://www.bilibili.com/video/{video.id}')
        elif video_ids[i][0] == 'Osf':
          print(f'Video available at https://osf.io/{video.id}')
      display(video)
    tab_contents.append(out)
  return tab_contents


video_ids = [('Youtube', 'UGByJ-_0whk'), ('Bilibili', 'BV1Dq4y1n7ks')]
tab_contents = display_videos(video_ids, W=854, H=480)
tabs = widgets.Tab()
tabs.children = tab_contents
for i in range(len(tab_contents)):
  tabs.set_title(i, video_ids[i][0])
display(tabs)
# @title Submit your feedback
content_review(f"{feedback_prefix}_Classification_with_a_Pretrained_Model_Video")まず、ImageNet で学習済みの DenseNet をロードする必要があります。torchvision.models を使うと、多くの人気のあるニューラルネットワークアーキテクチャの事前学習済みモデルを簡単に取得できます。
# Load a pre-trainied DenseNet model from torchvision.models
model = models.densenet121(pretrained=True)

# Switch the model to evaluation mode
model.eval()

# Load the class labels from a file
class_labels_url = "https://raw.githubusercontent.com/pytorch/hub/master/imagenet_classes.txt"
class_labels = urlopen(class_labels_url).read().decode("utf-8").split("\n")

# Define the transformation of the input image
transform = transforms.Compose([
    transforms.Resize(256),
    transforms.CenterCrop(224),
    transforms.ToTensor(),
    transforms.Normalize(mean=[0.485, 0.456, 0.406], std=[0.229, 0.224, 0.225]),
])モデルを使って最も可能性の高いクラスを予測する関数を定義します。モデルには画像のバッチを渡す必要があることに注意してください。画像が1枚だけなので、unsqueeze(0) を使って次元を追加すればよいです。
def predict(model, transform, image, class_labels):
  # Transform the image and convert it to a tensor
  image_tensor = transform(image).unsqueeze(0)

  # Pass the image through the model
  with torch.no_grad():
    output = model(image_tensor)

  # Select the class with the higherst probability and look up the name
  class_id = torch.argmax(output).item()
  class_name = class_labels[class_id]

  # Return the class name
  return class_name
犬の画像 を使って predict 関数をテストしましょう。
# Load and display the image
dog_image = Image.open(io.BytesIO(urlopen("https://unsplash.com/photos/2l0CWTpcChI/download?force=true&w=480").read()))
display(dog_image)

# Classify the image
display(predict(model, transform, dog_image, class_labels))
セクション 4.2: 動的アプリケーションの作成
# @title Video 9: Create a Dynamic Application
from ipywidgets import widgets
from IPython.display import YouTubeVideo
from IPython.display import IFrame
from IPython.display import display


class PlayVideo(IFrame):
  def __init__(self, id, source, page=1, width=400, height=300, **kwargs):
    self.id = id
    if source == 'Bilibili':
      src = f'https://player.bilibili.com/player.html?bvid={id}&page={page}'
    elif source == 'Osf':
      src = f'https://mfr.ca-1.osf.io/render?url=https://osf.io/download/{id}/?direct%26mode=render'
    super(PlayVideo, self).__init__(src, width, height, **kwargs)


def display_videos(video_ids, W=400, H=300, fs=1):
  tab_contents = []
  for i, video_id in enumerate(video_ids):
    out = widgets.Output()
    with out:
      if video_ids[i][0] == 'Youtube':
        video = YouTubeVideo(id=video_ids[i][1], width=W,
                             height=H, fs=fs, rel=0)
        print(f'Video available at https://youtube.com/watch?v={video.id}')
      else:
        video = PlayVideo(id=video_ids[i][1], source=video_ids[i][0], width=W,
                          height=H, fs=fs, autoplay=False)
        if video_ids[i][0] == 'Bilibili':
          print(f'Video available at https://www.bilibili.com/video/{video.id}')
        elif video_ids[i][0] == 'Osf':
          print(f'Video available at https://osf.io/{video.id}')
      display(video)
    tab_contents.append(out)
  return tab_contents


video_ids = [('Youtube', 'DJsK2bc9wuk'), ('Bilibili', 'BV1Vy4y1L7V9')]
tab_contents = display_videos(video_ids, W=854, H=480)
tabs = widgets.Tab()
tabs.children = tab_contents
for i in range(len(tab_contents)):
  tabs.set_title(i, video_ids[i][0])
display(tabs)
# @title Submit your feedback
content_review(f"{feedback_prefix}_Create_a_Dynamic_Application_Video")次に、/predict で画像を受け取りモデルに通す Flask アプリを作成します。また、画像をアップロードして API を呼び出すインタラクティブな UI も実装します。
UI はファイルアップロードフィールド、分類ボタン、アップロードした画像を表示する部分で構成されます。
index_template = """
<html>
    <head>
        <!-- Load vue.js and axois.js -->
        <script src="https://cdn.jsdelivr.net/npm/vue/dist/vue.js"></script>
        <script src="https://cdnjs.cloudflare.com/ajax/libs/axios/0.21.1/axios.min.js"></script>
    </head>
    <body>
        <!-- The APP UI -->
        <div id="app" style="width: 50%; margin: 200px auto">
            <form id="imageForm" enctype="multipart/form-data" method="POST" style="text-align: center; display: block">
                <label for="imageFile">Select image to classify:</label
                ><input id="imageFile" name="file" type="file" style="margin-left: 10px" />

                <img v-if="image" :src="image" style="width: 250px; display: block; margin: 50px auto 10px" />
                <div v-if="prediction" style="font-size: 32px; font-weight: bold; text-align: center">
                    {{ prediction }}
                </div>
                <input v-if="image" type="submit" value="Classify Image" style="margin: 20px 20px" />
            </form>
        </div>

        <script>
            <!-- The Vue application -->
            var app = new Vue({
                el: "#app",
                data() {
                    return {
                        image: null,
                        prediction: null,
                    };
                },
            });

            <!-- Calling the predict API when the form is submitted -->
            document.getElementById("imageForm").addEventListener("submit", (e) => {
                axios
                    .post("/predict", new FormData(document.getElementById("imageForm")), {
                        headers: {
                            "Content-Type": "multipart/form-data",
                        },
                    })
                    .then((response) => (app.prediction = response.data));

                e.preventDefault();
            });

            <!-- Display the selected image -->
            document.getElementById("imageFile").addEventListener("change", (e) => {
                const [file] = document.getElementById("imageFile").files;
                if (file) {
                    app.image = URL.createObjectURL(file);
                }
            });
        </script>
    </body>
</html>
"""
アプリケーションには2つのエントリポイントがあります:
/- インタラクティブな UI を持つ Vue テンプレートを提供/predict- 入力された画像を分類する REST API
app = Flask(__name__)

# Serve the Vue template with the interactive UI
@app.route("/")
def home():
  return index_template


# Classification API
@app.route("/predict", methods=['POST'])
def predict_api():
  # Fetch the image from the request and convert it to a Pillow image
  image_file = request.files['file']
  image_bytes = image_file.read()
  image = Image.open(io.BytesIO(image_bytes))

  # Predict the class from the image
  class_name = predict(model, transform, image, class_labels)

  # Return the result
  return class_name


# Run the app
run_with_ngrok(app)

## Uncomment below to run the app
# app.run()
セクション 5: Heroku で Flask アプリをデプロイする
# @title Video 10: Deploy on Heroku
from ipywidgets import widgets
from IPython.display import YouTubeVideo
from IPython.display import IFrame
from IPython.display import display


class PlayVideo(IFrame):
  def __init__(self, id, source, page=1, width=400, height=300, **kwargs):
    self.id = id
    if source == 'Bilibili':
      src = f'https://player.bilibili.com/player.html?bvid={id}&page={page}'
    elif source == 'Osf':
      src = f'https://mfr.ca-1.osf.io/render?url=https://osf.io/download/{id}/?direct%26mode=render'
    super(PlayVideo, self).__init__(src, width, height, **kwargs)


def display_videos(video_ids, W=400, H=300, fs=1):
  tab_contents = []
  for i, video_id in enumerate(video_ids):
    out = widgets.Output()
    with out:
      if video_ids[i][0] == 'Youtube':
        video = YouTubeVideo(id=video_ids[i][1], width=W,
                             height=H, fs=fs, rel=0)
        print(f'Video available at https://youtube.com/watch?v={video.id}')
      else:
        video = PlayVideo(id=video_ids[i][1], source=video_ids[i][0], width=W,
                          height=H, fs=fs, autoplay=False)
        if video_ids[i][0] == 'Bilibili':
          print(f'Video available at https://www.bilibili.com/video/{video.id}')
        elif video_ids[i][0] == 'Osf':
          print(f'Video available at https://osf.io/{video.id}')
      display(video)
    tab_contents.append(out)
  return tab_contents


video_ids = [('Youtube', 'kaf6z-tAxCY'), ('Bilibili', 'BV1oo4y1S77Z')]
tab_contents = display_videos(video_ids, W=854, H=480)
tabs = widgets.Tab()
tabs.children = tab_contents
for i in range(len(tab_contents)):
  tabs.set_title(i, video_ids[i][0])
display(tabs)
# @title Submit your feedback
content_review(f"{feedback_prefix}_Deploy_on_Heroku_Video")ノートブックの外で実際のウェブサーバーとしてアプリケーションをデプロイします。ここでは Heroku を使います。Heroku は PaaS(Platform-as-a-Service)で、事前設定済みの環境を提供し、簡単かつ迅速にアプリをデプロイできます。無料プランもあり、シンプルなアプリのデプロイには十分です。
まずはローカルでアプリをテストする必要があります。
セクション 5.1: 環境の準備
# @title Video 11: Prepare Python Environment
from ipywidgets import widgets
from IPython.display import YouTubeVideo
from IPython.display import IFrame
from IPython.display import display


class PlayVideo(IFrame):
  def __init__(self, id, source, page=1, width=400, height=300, **kwargs):
    self.id = id
    if source == 'Bilibili':
      src = f'https://player.bilibili.com/player.html?bvid={id}&page={page}'
    elif source == 'Osf':
      src = f'https://mfr.ca-1.osf.io/render?url=https://osf.io/download/{id}/?direct%26mode=render'
    super(PlayVideo, self).__init__(src, width, height, **kwargs)


def display_videos(video_ids, W=400, H=300, fs=1):
  tab_contents = []
  for i, video_id in enumerate(video_ids):
    out = widgets.Output()
    with out:
      if video_ids[i][0] == 'Youtube':
        video = YouTubeVideo(id=video_ids[i][1], width=W,
                             height=H, fs=fs, rel=0)
        print(f'Video available at https://youtube.com/watch?v={video.id}')
      else:
        video = PlayVideo(id=video_ids[i][1], source=video_ids[i][0], width=W,
                          height=H, fs=fs, autoplay=False)
        if video_ids[i][0] == 'Bilibili':
          print(f'Video available at https://www.bilibili.com/video/{video.id}')
        elif video_ids[i][0] == 'Osf':
          print(f'Video available at https://osf.io/{video.id}')
      display(video)
    tab_contents.append(out)
  return tab_contents


video_ids = [('Youtube', 'IMd_sRm4fJM'), ('Bilibili', 'BV1bv411K7dP')]
tab_contents = display_videos(video_ids, W=854, H=480)
tabs = widgets.Tab()
tabs.children = tab_contents
for i in range(len(tab_contents)):
  tabs.set_title(i, video_ids[i][0])
display(tabs)
# @title Submit your feedback
content_review(f"{feedback_prefix}_Prepare_Python_Environment_Video")ここから先はノートブックではなく、ご自身のマシンで作業してください。Python 3 とコードエディタ(例: VS Code)がインストールされていることを確認してください。このセクションではターミナルも多用します。
まず、Python 環境を準備し、必要な依存関係をインストールします。アプリケーションを保存する空のフォルダを作成し、以下の手順を行ってください。
1. 新しい仮想環境を作成する
ターミナルで以下のコマンドを実行して Python の仮想環境を作成します:
python -m venv .venv
2. 仮想環境を有効化する
次に環境を有効化します。Linux/macOS と Windows で方法が異なります。
Linux/macOS の場合:
source .venv/bin/activate
Windows の場合:
.venv\Scripts\activate.bat
3. 依存関係をインストールする
以下のパッケージを pip でインストールします:
pip install flask Pillow gunicorn
注意:
gunicornは Heroku 上でコードを実行する際に必要なウェブサーバーです。
4. PyTorch をインストールする
システムによって torch と torchvision のインストール方法が異なります。正確なコマンドはインストールページを参照してください。pip の使用を推奨します。
macOS や Windows では例えば以下のように簡単です:
pip install torch torchvision
注意:
torchaudioは不要で、Heroku でのパッケージサイズの問題を引き起こす可能性があるためインストールを避けてください。
セクション 5.2: アプリケーションの作成
# @title Video 12: Creating a Local Application
from ipywidgets import widgets
from IPython.display import YouTubeVideo
from IPython.display import IFrame
from IPython.display import display


class PlayVideo(IFrame):
  def __init__(self, id, source, page=1, width=400, height=300, **kwargs):
    self.id = id
    if source == 'Bilibili':
      src = f'https://player.bilibili.com/player.html?bvid={id}&page={page}'
    elif source == 'Osf':
      src = f'https://mfr.ca-1.osf.io/render?url=https://osf.io/download/{id}/?direct%26mode=render'
    super(PlayVideo, self).__init__(src, width, height, **kwargs)


def display_videos(video_ids, W=400, H=300, fs=1):
  tab_contents = []
  for i, video_id in enumerate(video_ids):
    out = widgets.Output()
    with out:
      if video_ids[i][0] == 'Youtube':
        video = YouTubeVideo(id=video_ids[i][1], width=W,
                             height=H, fs=fs, rel=0)
        print(f'Video available at https://youtube.com/watch?v={video.id}')
      else:
        video = PlayVideo(id=video_ids[i][1], source=video_ids[i][0], width=W,
                          height=H, fs=fs, autoplay=False)
        if video_ids[i][0] == 'Bilibili':
          print(f'Video available at https://www.bilibili.com/video/{video.id}')
        elif video_ids[i][0] == 'Osf':
          print(f'Video available at https://osf.io/{video.id}')
      display(video)
    tab_contents.append(out)
  return tab_contents


video_ids = [('Youtube', 'fF1fmIXz5NQ'), ('Bilibili', 'BV1bM4y157xK')]
tab_contents = display_videos(video_ids, W=854, H=480)
tabs = widgets.Tab()
tabs.children = tab_contents
for i in range(len(tab_contents)):
  tabs.set_title(i, video_ids[i][0])
display(tabs)
# @title Submit your feedback
content_review(f"{feedback_prefix}_Creating_a_Local_Application_Video")アプリケーションに必要なファイルを作成する準備ができました。今のところ必要なのは2つのファイルだけです。
app.py
これはアプリケーションのメインファイルです。PyTorch モデルの実行コードと Flask アプリケーションのコードをここに記述します。
import os
import io
import torch
from urllib.request import urlopen
from PIL import Image
from torchvision import models
import torchvision.transforms as transforms
from flask import Flask, request, send_from_directory
torchvision.models から事前学習済みの DenseNet モデルをロード
model = models.densenet121(pretrained=True)
model.eval()
クラスラベルをファイルからロード
class_labels_url = (
"https://raw.githubusercontent.com/pytorch/hub/master/imagenet_classes.txt"
)
class_labels = urlopen(class_labels_url).read().decode("utf-8").split("\n")
入力画像の変換を定義
transform = transforms.Compose([
transforms.Resize(256),
transforms.CenterCrop(224),
transforms.ToTensor(),
transforms.Normalize(mean=[0.485, 0.456, 0.406], std=[0.229, 0.224, 0.225]),
])
def predict(model, transform, image, class_labels):
画像を変換しテンソルに変換
image_tensor = transform(image).unsqueeze(0)
モデルに画像を通す
with torch.no_grad():
output = model(image_tensor)
最も確率の高いクラスを選択
class_id = torch.argmax(output).item()
class_name = class_labels[class_id]
return class_name
app = Flask(name)
@app.route("/")
def home():
return send_from_directory("static", "index.html")
@app.route("/predict", methods=["POST"])
def predict_api():
リクエストから画像を取得し変換
image_file = request.files["file"]
image_bytes = image_file.read()
image = Image.open(io.BytesIO(image_bytes))
画像からクラスを予測
class_name = predict(model, transform, image, class_labels)
結果を JSON として返す
return class_name
アプリを実行
if name == "main":
app.run(debug=False, threaded=True, port=os.getenv("PORT", 5000))
static/index.html
このファイルには Vue テンプレートの HTML コードをそのまま記述してください。
<html>
    <head>
        <!-- vue.js と axios.js を読み込み -->
        <script src="https://cdn.jsdelivr.net/npm/vue/dist/vue.js"></script>
        <script src="https://cdnjs.cloudflare.com/ajax/libs/axios/0.21.1/axios.min.js"></script>
    </head>
    <body>
        <!-- アプリの UI -->
        <div id="app" style="width: 50%; margin: 200px auto">
            <form id="imageForm" enctype="multipart/form-data" method="POST" style="text-align: center; display: block">
                <label for="imageFile">分類する画像を選択:</label
                ><input id="imageFile" name="file" type="file" style="margin-left: 10px" />

                <img v-if="image" :src="image" style="width: 250px; display: block; margin: 50px auto 10px" />
                <div v-if="prediction" style="font-size: 32px; font-weight: bold; text-align: center">
                    {{ prediction }}
                </div>
                <input v-if="image" type="submit" value="画像を分類" style="margin: 20px 20px" />
            </form>
        </div>

        <script>
            <!-- Vue アプリケーション -->
            var app = new Vue({
                el: "#app",
                data() {
                    return {
                        image: null,
                        prediction: null,
                    };
                },
            });

            <!-- フォーム送信時に predict API を呼び出す -->
            document.getElementById("imageForm").addEventListener("submit", (e) => {
                axios
                    .post("/predict", new FormData(document.getElementById("imageForm")), {
                        headers: {
                            "Content-Type": "multipart/form-data",
                        },
                    })
                    .then((response) => (app.prediction = response.data));

                e.preventDefault();
            });

            <!-- 選択した画像を表示 -->
            document.getElementById("imageFile").addEventListener("change", (e) => {
                const [file] = document.getElementById("imageFile").files;
                if (file) {
                    app.image = URL.createObjectURL(file);
                }
            });
        </script>
    </body>
</html>
セクション 5.3: ローカルでアプリケーションをテストする
環境が正しくセットアップされ、アプリケーションファイルが作成できたら、以下のコマンドでアプリを起動できます:
python app.py
ブラウザで http://127.0.0.1:5000 にアクセスしてください。もう ngrok は必要ありません!
セクション 5.4: Heroku デプロイの準備
# @title Video 13: Preparing for Heroku
from ipywidgets import widgets
from IPython.display import YouTubeVideo
from IPython.display import IFrame
from IPython.display import display


class PlayVideo(IFrame):
  def __init__(self, id, source, page=1, width=400, height=300, **kwargs):
    self.id = id
    if source == 'Bilibili':
      src = f'https://player.bilibili.com/player.html?bvid={id}&page={page}'
    elif source == 'Osf':
      src = f'https://mfr.ca-1.osf.io/render?url=https://osf.io/download/{id}/?direct%26mode=render'
    super(PlayVideo, self).__init__(src, width, height, **kwargs)


def display_videos(video_ids, W=400, H=300, fs=1):
  tab_contents = []
  for i, video_id in enumerate(video_ids):
    out = widgets.Output()
    with out:
      if video_ids[i][0] == 'Youtube':
        video = YouTubeVideo(id=video_ids[i][1], width=W,
                             height=H, fs=fs, rel=0)
        print(f'Video available at https://youtube.com/watch?v={video.id}')
      else:
        video = PlayVideo(id=video_ids[i][1], source=video_ids[i][0], width=W,
                          height=H, fs=fs, autoplay=False)
        if video_ids[i][0] == 'Bilibili':
          print(f'Video available at https://www.bilibili.com/video/{video.id}')
        elif video_ids[i][0] == 'Osf':
          print(f'Video available at https://osf.io/{video.id}')
      display(video)
    tab_contents.append(out)
  return tab_contents


video_ids = [('Youtube', 'L2W0C7nMttI'), ('Bilibili', 'BV1Nq4y1Q71H')]
tab_contents = display_videos(video_ids, W=854, H=480)
tabs = widgets.Tab()
tabs.children = tab_contents
for i in range(len(tab_contents)):
  tabs.set_title(i, video_ids[i][0])
display(tabs)
# @title Submit your feedback
content_review(f"{feedback_prefix}_Preparing_for_Heroku_Video")Heroku にデプロイする前にいくつか準備が必要です。
Procfile を作成する
Heroku 上で動作するすべてのアプリには Procfile が必要で、アプリの起動方法を指定します。今回は gunicorn をウェブサーバーとして使うので簡単です。アプリのルートフォルダに Procfile を作成し、以下の内容を記述してください:
web: gunicorn app:app
requirements.txt を作成する
Heroku にインストールする Python パッケージを伝えるため、標準的な requirements.txt ファイルを作成します。以下のコマンドで作成可能です:
pip freeze > requirements.txt
torch のバージョンを修正する
理論上はこれで十分ですが、1点だけ修正が必要です。デフォルトの torch は CPU と GPU 両方のコードを含み、Heroku の無料プランの最大サイズ制限を超えてしまいます。そこで CPU 版のみを指定する必要があります。
requirements.txt を開き、以下のように修正してください:
- 先頭に以下の行を追加し、Heroku にパッケージの場所を指定します:
-f https://download.pytorch.org/whl/torch_stable.html
torchの行を見つけて以下のように変更します:
torch==1.9.0+cpu
- 同様に
torchvisionの行も以下のように変更します:
torchvision==0.10.0+cpu
セクション 5.5: Heroku へのデプロイ
# @title Video 14: Deploying on Heroku
from ipywidgets import widgets
from IPython.display import YouTubeVideo
from IPython.display import IFrame
from IPython.display import display


class PlayVideo(IFrame):
  def __init__(self, id, source, page=1, width=400, height=300, **kwargs):
    self.id = id
    if source == 'Bilibili':
      src = f'https://player.bilibili.com/player.html?bvid={id}&page={page}'
    elif source == 'Osf':
      src = f'https://mfr.ca-1.osf.io/render?url=https://osf.io/download/{id}/?direct%26mode=render'
    super(PlayVideo, self).__init__(src, width, height, **kwargs)


def display_videos(video_ids, W=400, H=300, fs=1):
  tab_contents = []
  for i, video_id in enumerate(video_ids):
    out = widgets.Output()
    with out:
      if video_ids[i][0] == 'Youtube':
        video = YouTubeVideo(id=video_ids[i][1], width=W,
                             height=H, fs=fs, rel=0)
        print(f'Video available at https://youtube.com/watch?v={video.id}')
      else:
        video = PlayVideo(id=video_ids[i][1], source=video_ids[i][0], width=W,
                          height=H, fs=fs, autoplay=False)
        if video_ids[i][0] == 'Bilibili':
          print(f'Video available at https://www.bilibili.com/video/{video.id}')
        elif video_ids[i][0] == 'Osf':
          print(f'Video available at https://osf.io/{video.id}')
      display(video)
    tab_contents.append(out)
  return tab_contents


video_ids = [('Youtube', 'Ni9YKotZUQk'), ('Bilibili', 'BV1P64y1z7cU')]
tab_contents = display_videos(video_ids, W=854, H=480)
tabs = widgets.Tab()
tabs.children = tab_contents
for i in range(len(tab_contents)):
  tabs.set_title(i, video_ids[i][0])
display(tabs)
# @title Submit your feedback
content_review(f"{feedback_prefix}_Deploying_on_Heroku_Video")ついに Heroku へのデプロイ準備が整いました!手順は以下の通りです。
1. Heroku アカウントを作成する
Heroku で無料アカウントを作成してください。
2. Heroku CLI をインストールする
こちらのガイドを参照して、お使いのシステムに Heroku CLI をインストールしてください。インストール後、ターミナルで heroku コマンドが使えるようになります。
3. Heroku にログインする
ターミナルで以下のコマンドを実行し、ログインします:
heroku login
4. 新しい Heroku アプリを作成する
以下のコマンドで新しいアプリを作成します。アプリ名はまだ使われていないものを選んでください。名前に自分の名前を入れるのも良いでしょう(例: vladimir-classifier-app)。
heroku create <application name>
5. Git リポジトリを初期化する
Heroku へのデプロイは git を使います。まだインストールしていなければこちらのガイドを参照してください。リポジトリを初期化し、ファイルをコミットして Heroku にプッシュします:
git init
git add app.py Procfile requirements.txt static
git commit -m "Initial commit"
heroku git:remote -a <application name>
git push heroku master
これでアプリがパッケージ化され Heroku にアップロードされます。数分かかることがありますが、完了すると https://<application name>.herokuapp.com でアクセス可能になります。
ダッシュボードからもアプリを確認できます: https://dashboard.heroku.com/apps
まとめ
# @title Video 15: Summary
from ipywidgets import widgets
from IPython.display import YouTubeVideo
from IPython.display import IFrame
from IPython.display import display


class PlayVideo(IFrame):
  def __init__(self, id, source, page=1, width=400, height=300, **kwargs):
    self.id = id
    if source == 'Bilibili':
      src = f'https://player.bilibili.com/player.html?bvid={id}&page={page}'
    elif source == 'Osf':
      src = f'https://mfr.ca-1.osf.io/render?url=https://osf.io/download/{id}/?direct%26mode=render'
    super(PlayVideo, self).__init__(src, width, height, **kwargs)


def display_videos(video_ids, W=400, H=300, fs=1):
  tab_contents = []
  for i, video_id in enumerate(video_ids):
    out = widgets.Output()
    with out:
      if video_ids[i][0] == 'Youtube':
        video = YouTubeVideo(id=video_ids[i][1], width=W,
                             height=H, fs=fs, rel=0)
        print(f'Video available at https://youtube.com/watch?v={video.id}')
      else:
        video = PlayVideo(id=video_ids[i][1], source=video_ids[i][0], width=W,
                          height=H, fs=fs, autoplay=False)
        if video_ids[i][0] == 'Bilibili':
          print(f'Video available at https://www.bilibili.com/video/{video.id}')
        elif video_ids[i][0] == 'Osf':
          print(f'Video available at https://osf.io/{video.id}')
      display(video)
    tab_contents.append(out)
  return tab_contents


video_ids = [('Youtube', 'pDLdNOuUtKk'), ('Bilibili', 'BV1Qg411L7RM')]
tab_contents = display_videos(video_ids, W=854, H=480)
tabs = widgets.Tab()
tabs.children = tab_contents
for i in range(len(tab_contents)):
  tabs.set_title(i, video_ids[i][0])
display(tabs)
# @title Submit your feedback
content_review(f"{feedback_prefix}_Summary_Video")このチュートリアルでは、動的なウェブアプリケーションや REST API を作成するための最新ツールの基本を学びました。また、ニューラルネットワークモデルをウェブアプリとしてデプロイする方法も習得しました。
ここからさらに発展させて、より高度で素晴らしいアプリケーションを作り、何百万人もの人々に提供できるようになります!